

Okay, so you built yourself some nice WordPress blog or a business website with amazing features. You have some nice content to show, but the images you upload are so heavy, your website is slow. You thought that it’ll be just fine if you install some image optimization plugin. Sometimes it will work, but sometimes it will not. Let’s focus on those times when it doesn’t work.
Possible problems:
- thumbnails are blurry after using optimization plugin
- thumbnails and images generally are too big without using optimization tools
- images (including logo etc) are blurry on Chrome, Opera, but not on Firefox 🙂
- WordPress is generating far too many thumbnails then you’ll ever use, and all are blurry or too big in size, your disk space suffer
Solution:
(if you’re looking on how to fix blurry images only on Chrome, Opera, etc then just use this code:
img {
  image-rendering: auto;
  image-rendering: crisp-edges;
  image-rendering: pixelated;
}
Add the code to your custom CSS, or to your child theme.
Before we do any of the steps below, we have to tell WordPress not to decrease JPG quality on image upload or any. So, paste the following code in your theme’s functions.php file or in a plugin acting like a custom function.php file. For that you can use plugins like MY Custom Functions or Code Snippets.
This is the code:
add_filter('jpeg_quality', function($arg){return 100;});
(ALERT: you might see somewhere on the web another code doing the same thing, but I suggest you ignore it, since it is not compatible with the latest PHP 7.2x.
This is the deprecated code:
add_filter( 'jpeg_quality', create_function( '', 'return 100;' ) );
You also might stumble upon this code:
add_filter( 'wp_editor_set_quality', function($arg){return 100;} );
It will do more bad than good, therefore ignore that too.)
-
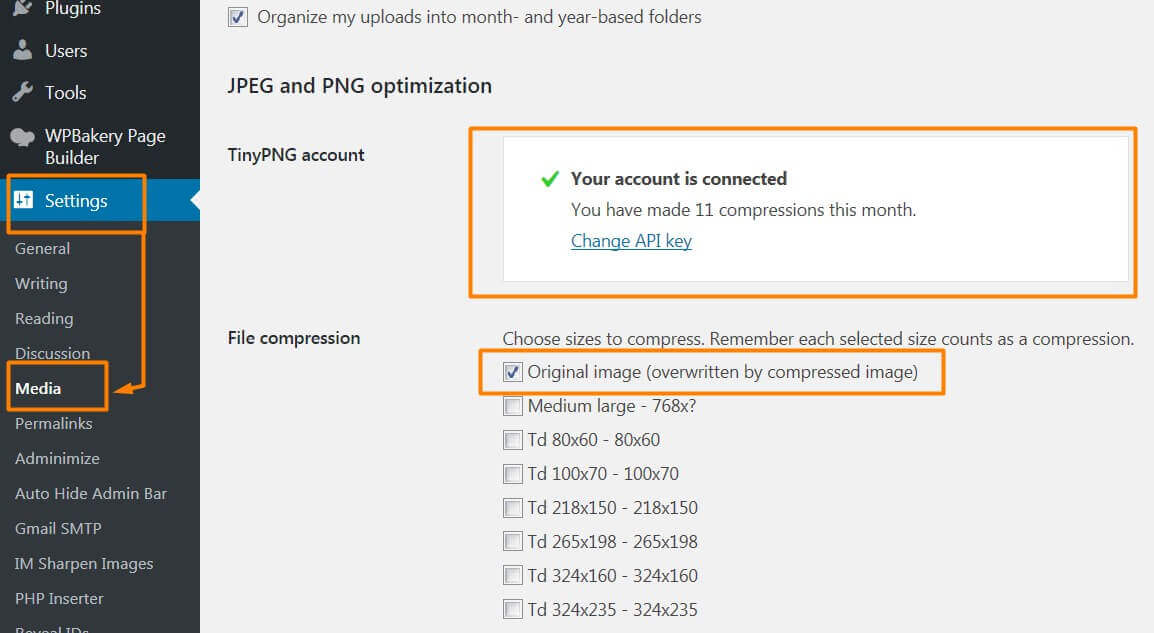
- Install Tiny PNG plugin, get the API key here, activate it and insert the key

This is where you can ask for your API key - In settings tick the ““
- Scroll more down and tick “Resize and compress the original image”
Tiny PNG options plugin panel - Install plugin Optimize image resizing, navigate to >Tools>Remove all image sizes
- After the process finishes, all your extra thumbnails created by WordPress will be removed. Don’t worry, thumbnails will be automatically created once you need any size type

Here it’s visible how to complete steps 4 and 6 - Install plugin Force regenerate thumbnails, go to >Tools>Force Regenerate Thumbnails
- Done: your images are crystal clear, optimized. Everyone is happy 🙂
- Install Tiny PNG plugin, get the API key here, activate it and insert the key
ps. for some extra sharpness which is in 99,99% not needed, you can use:
ImageMagick Sharpen Resized Images plugin, which requires some extra console typing, like installing it on VPS (but only if you don’t have it installed). For any extra questions about this plugin or ImageMagic installation on your server please use comments bellow.
Also you can use Tiny PNG website to drag and drop, pretty neat. You can use TinyPNG to optimize any image not just website related.
Cheers


 code from loading on your posts")
Thanks for the ImageMagic
Np
Realy great information
Thank you 🙂
Ummm. This just made my images worse. I was suffering from resized images looking bad in Chrome, but fine in Edge or IE. I hoped this might even things out, but now they all look like crap even in Edge.
Any suggestions on reverting? It cannot be as easy as just going backwards…
Hi,
If you suffer from blurry looking images in chrome, then you can use this code only:
img {

  image-rendering: auto;

  image-rendering: crisp-edges;

  image-rendering: pixelated;

}
Please note that after every image tweak you need to ‘regenerate thumbnails’. You can regenerate thumbnails with a plugin (https://wordpress.org/plugins/force-regenerate-thumbnails/)
It is also very important to clear all caching plugins and, even better, to disable all caching plugins.
If you think something went wrong and things are not working or it made everything worse, then you have few options left:
You can use this plugin: Optimize Images Resizing, which will delete all thumbnails. Once you visit your website pages/posts, the needed thumbnails will be generated. This plugin also saves your storage space by preventing WordPress in generating unnecessary image sizes.
What I would do in your position is this:
0. Step zero 🙂 – (because I forgot to mention something) – Clear your browser’s cache, then Enable Maintenance mode > Disable all image optimization plugins or custom codes
1. Clear all cache and disable all caching plugins or whatever you use for caching (if you use any server-side caching disable that too if needed)
2. force regenerate thumbnails
3. Optimize image resizing
4. enter the above code to your custom CSS file/area
5. Visit your website/posts/pages
6. Your images are crystal clear, there is no way they are blurry, unless your wordpress installation/theme is faulty.
If this didn’t work for you, please write about your serverstats, wordpress version and theme version.
Cheers