

POST LAST UPDATE: 14.10.2021.
* WTServer changed its name to WinNMP some time ago, so if it is more convenient for you, when reading paths just use WinNMP instead of WTServer.
I’m the type of person who will stay committed as long as there are no big reasons to stop. I’ve been a WAMP user since forever. Never even tried something else. Even when WAMP started to go really slow, I stood by its side. Now, I got pushed to the point where I can no longer care. It is time for something else, something wild.
Before I say anything about the WTServer (WinNMP), I have to mention that I tried many other stacks: (Xampp, BitNami, WAMP Pro).
BitNami is nice and fast but I was not allowed to install more than just one WordPress installation.
Xampp is great too but still robust for my taste.
Wamp Pro – fast but outdated – costs money. Not worth it.
At the point where I almost switched to Xampp, I heard about ServerPilot (EasyEngine is better as of summer 2018)and how it runs on NginX over Apache. (but this is for another post)
WinNMP
It took me full 4 seconds to pop-up my Firefox and start searching for Nginx local stack. NginX is the present and the future. Fu*k LAMP stacks, and then I discovered WTServer (today WinNMP) and everything else is past tense.
WinNMP is great addition to my local environment since all my sites flow with NginX on Digital Ocean droplets or Google compute instances.
Before you go with WinNMP, I recommend installing Notepad++.
You do have an integrated “Adminer”, but there is also a HeidiSQL.
During the installation I recommend installing PHP 7 and 7.2. If you have 64bit system then just install 64bit versions.
Installation and Php.ini configuration
All you gotta do is to download the WinNMP, install and run few customizations for best
compatibility with WordPress.
– After the download, start your installation.
– If everything went well (and it should) it is time for customizations.
– Navigate to C:\WinNMP\conf\php.ini, then go to line 18 ( ) and comment it out putting the “;” at the beginning of the line.
This will comment out the whole line and there wont be any disabled
functions that WordPress might want to use.
– Disable short_open_tag replace “On” to “Off”( short_open_tag = off )
– It’s a good idea to change these like this:
post_max_size = 80M
max_execution_time = 300
max_input_time = 150
memory_limit = 256M
upload_max_filesize = 200M
max_file_uploads = 9000
Of course those are my numbers, you can experiment on your own.
-(Optional): You can add an extra field which can come in handy:
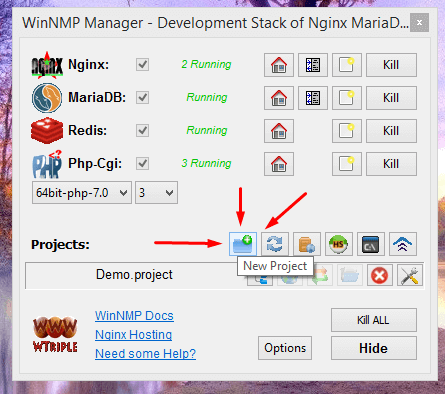
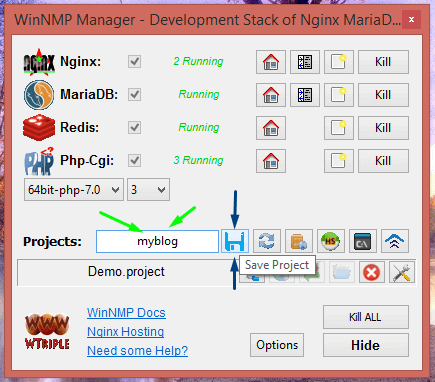
max_input_vars = 5000First you need to create a project:
WordPress Installation
- Run Adminer and create new database:

During the installation you will be asked to enter database information. So, database name is the name you created inside Adminer (picture above).
For database user type: root
The password field should be empty by default. Everything else can be left as it is.
Configuring “nginx.conf“
While uploading files trough the WordPress (theme, plugins…) you might get this error:

(current version has it on 33m by DEFAULT) – but if you run into a problem like this you will know where to look first
To fix it, navigate to C:\WinNMP\conf\nginx.conf and find this:
# php max upload limit cannot be larger than this
client_max_body_size 8m;
Change to something bigger. I changed it to 25m, or as current default value: 33m.
Permalinks
There’s a trick I couldn’t find anywhere which saved me from flushing it all down the toilet. After everything I’ve been trough ( the search for perfect environment, configuration..) enabling Permalinks was the next logical step. You do not want your links too look ridiculous. So, I did just that and I got an error 404.

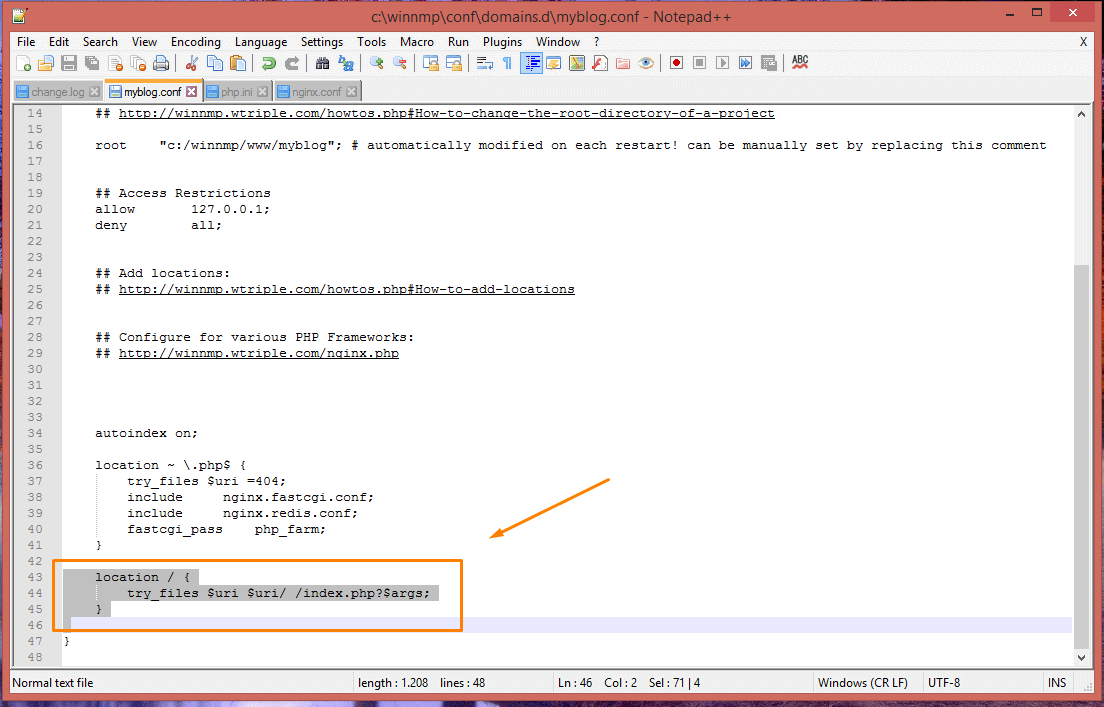
- navigate to C:\WINnmp\conf\nginx.conf.
- Replace the
location / {directive with:
    location / {
        try_files $uri $uri/ /index.php?$args;
    }
Or you can do that by opening the file through the WinNMP manager and clicking on
“Edit Nginx Virtual Server” button:
… now it looks like this:
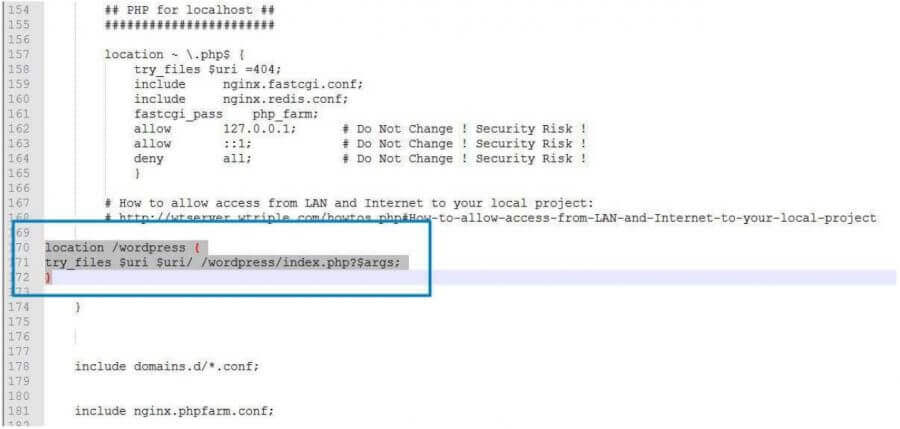
#For older versions this trick will work just fine:
– navigate to C:\WTServer\conf\nginx.conf. (or C:\WinNMP\conf\nginx.conf)
Add this to it after every WordPress installation:
location /nameofyourfolder {
try_files $uri $uri/ /nameofyourfolder/index.php?$args;
}
Please replace the ‘nameofyourfolder’ with your folder name where’s your WordPress installation placed. You should add this for every WordPress installation if you want it to work with Permalinks enabled.
In case you are asking yourself for the exact location on where to put this code inside “nginx.conf” file, well just put it at the end, like this for example:
After that you’re all set to go.
(Use this too: https://wtserver.wtriple.com/nginx.php#Wordpress-Nginx-configuration)
Although I prefer adding all projects configurations for permalinks to default “nginx.conf” file, I feel responsible to add the part on “custom domain name live url” for your every project. Which is recommended by WTServer anyway.
In that case you have to:
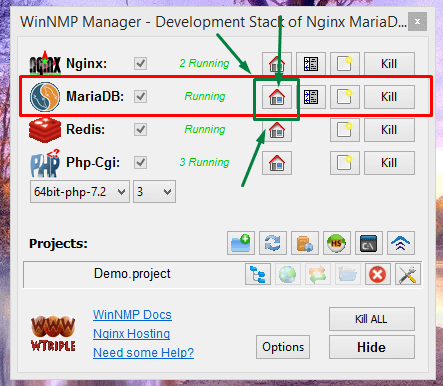
- put your WordPress files inside WWW folder (as usual),
- restart WTServer,
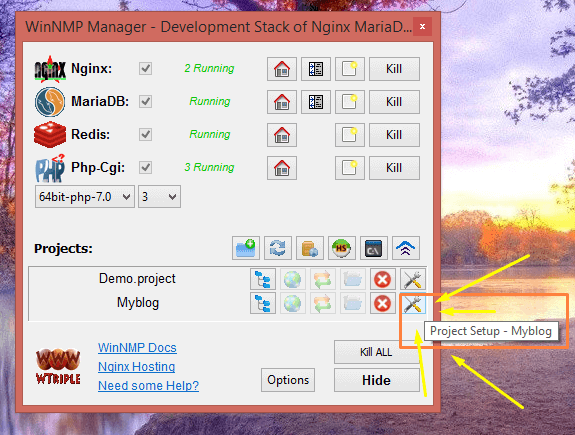
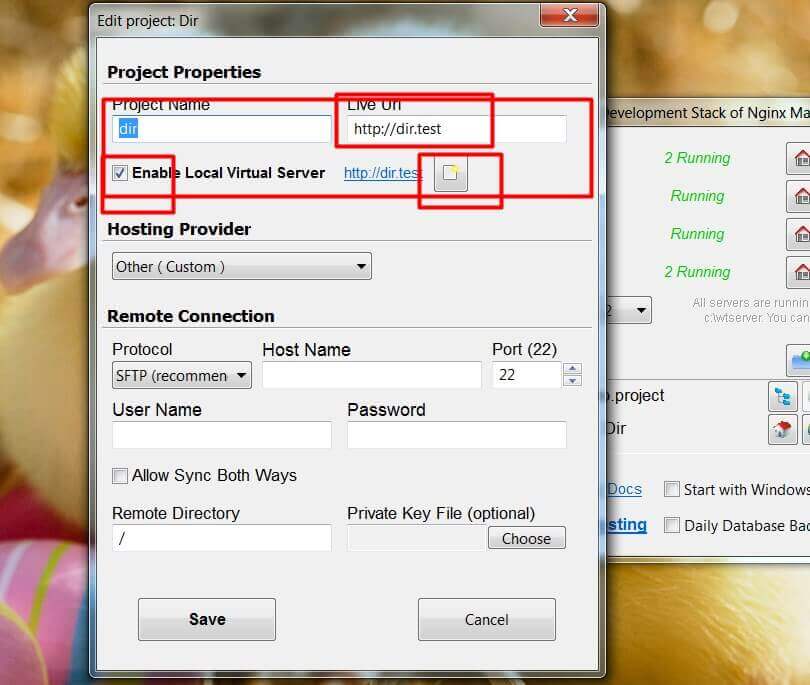
- inside ”Projects:” box click on your exact project settings (I called mine “Dir” – as shown below):
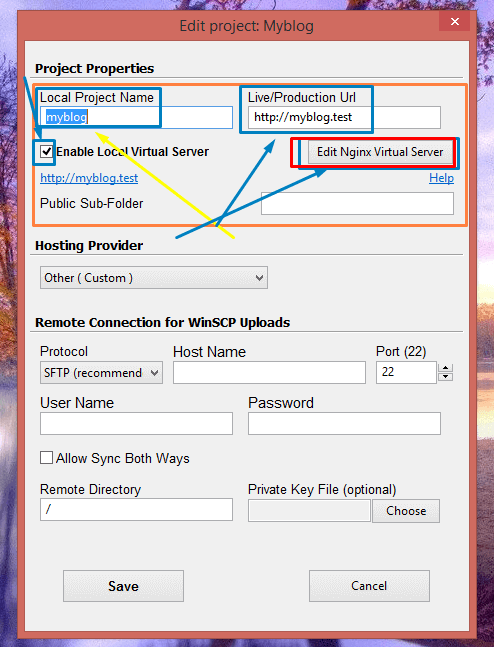
… then enter custom live url and check the box “Enable Local Virtual Server”. After that open your project configuration file by clicking the button shown below:
Add this to the opened file:
rewrite /wp-admin$ $scheme://$host$uri/ permanent;
    if (!-e $request_filename) {
        rewrite ^.+/?(/wp-.*) $1 last;
        rewrite ^.+/?(/.*\.php)$ $1 last;
        rewrite ^(.+)$ /index.php?q=$1 last;
    }
You are all set and you can access your local project using your custom url.


Hi, it’s strange I edited post_max_size and upload_max_filesize in C:\WinNMP\conf\php.ini and restarted php-cgi but my WordPress upload stays at 1M.
Hi, the file path is correct, however you should restart (Kill all servers) and then start the manager again, but
you probably did it already.
I replicated your issue by installing new version and the same problem occurred to my installation.
So to make it work for sure do this:
1. copy your current C:\WinNMP\conf\php.ini file to a safe location.
2. DELETE the php.ini file
3. Kill all servers and start WinNMP (WTServer) again.
– this will automatically make and configure default php.ini file.
4. Open the new php.ini file and edit it the way you want. If you want you can replace the default php.ini with the one you saved.
5. Kill all servers and start the manager.
6. Everything should be working.
If this doesn’t help just let me know and I’ll find another solution.
I am receiving 502 bad gateway, anyway to fix this issue?
Hi Joe,
if you could tell me a little bit more about the issue I might be able to help better.
What exactly is your current configuration? I mean, did you tamper with the files in any other way than described in my post?
This issue could be related to the listening ip/port or some extra enabled modules. But I can’t be sure, you will have to tell me a little bit more.